HL7+ TCP/IP Router
*All screenshots are from the UltraPort HL7 Postmaster
 Use an HL7+ TCP/IP Router destination to send HL7 messages to the HL7+ TCP/IP Router. For this to work you must either have the HL7+ TCP/IP Router installed and running on the same computer or on a computer connected to it within the same LAN, WAN or VPN.
Add a HL7+ TCP/IP Router to your HL7+ Installations in the HL7+ Management Console.
The HL7+ TCP/IP Router (or the UltraPort HL7 TCP/IP Router) is an HL7 "sender". It transmits HL7 messages over TCP/IP to any HL7 standard TCP/IP "listener" application. In a nutshell, the UltraPort Router monitors a file system folder (selected by you) for HL7 message data files and when detected, it extracts all HL7 messages and transmits them to an HL7 standard Listener (receiver). We explain this here because, while it might seem counter-intuitive, you should only NEED to create this type of destination IF the UltraPort HL7 Router is actually RUNNING on a DIFFERENT computer/server than the UltraPort HL7 Postmaster. If the UltraPort Router is running on the same computer/server then a better option is to just create a File System Folder Destination and then configure the UltraPort Router to monitor that folder.
In addition to creating your UltraPort Router Destination in the Postmaster you must also insure that the UltraPort Router itself is configured to receive HL7 messages sent by the Postmaster on the Interface Port Number you enter in the Postmaster UltraPort Router Destination properties. This is done in the UltraPort Router software in the "Optional Router Profile Settings" (see the screen-shot below).
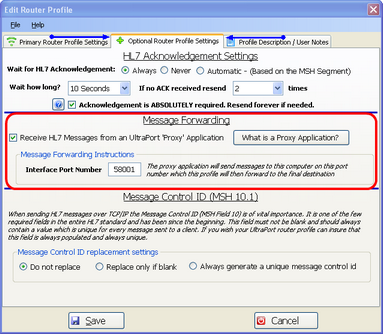
The UltraPort HL7 Router (Optional Profile Settings)
To Create a New UltraPort Router Destination
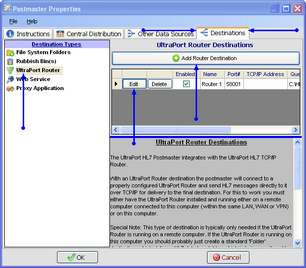
•First. Edit the selected postmaster (see Creating and Editing Postmasters) and select the Other Data Sources tab. In the Other Data Sources tab select UltraPort Router in the Destination Types list.
Second. If creating a new Router destination click the ![]() Add Router Destination button, otherwise click the 'Edit' button next to one of the existing destinations in the list to open up the Proxy Destination properties window. In the properties window fill out steps 1 through 5 and click
Add Router Destination button, otherwise click the 'Edit' button next to one of the existing destinations in the list to open up the Proxy Destination properties window. In the properties window fill out steps 1 through 5 and click ![]() to save your destination.
to save your destination.
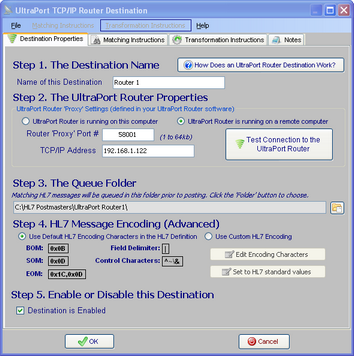
Step 1. The Destination Name. All Postmaster objects (data sources and destinations) must have a unique name. It's completely user defined and alpha-numeric and follows the same rules as creating a file or folder name in MS Windows.
Step 2. The UltraPort Router Properties. The Router "Proxy" Port # you enter in Step 2 must match the Interface Port Number you enter in the UltraPort Router Profile. Since the HL7 Postmaster is going to be "Sending" HL7 messages to the UltraPort Router you will need to know the TCP/IP Address of the computer/server where the UltraPort Router is running.
Extended Feature: Test the connection to the UltraPort Router. If you've entered all of the values in Step 2 you can test the connection to the UltraPort Router (it must be running and waiting for HL7 messages) by clicking this button:
![]()
Step 3. The Queue Folder. Even if the Proxy Application at the other end of your destination is not running, the Postmaster will continue to deliver HL7 messages to it by "Queuing" up the messages in the Queue folder until the Proxy Application comes back online. Click the ![]() button to browse for the folder which the postmaster should use for this.
button to browse for the folder which the postmaster should use for this.
Step 4. HL7 Message Encoding (Advanced). The HL7 Encoding characters instruct HL7 parsers in how to properly "read" an HL7 message. Changing this from the default is RARELY needed. A good general rule of thumb is this test: If you don't KNOW whether or not you need to change the HL7 Message Encoding then you don't need to change it, and you should just leave it as the default.
Step 5. Enable or Disable this Data Source. Check the box to enable the destination, uncheck it to disable the data source.
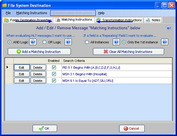
Extended Feature (Optional): You can enter Matching Instructions to filter the HL7 messages delivered to the proxy application:
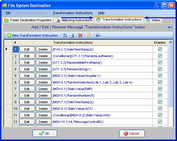
Extended Feature (Optional): You can enter Transformation Instructions to dynamically change HL7 message data BEFORE it is delivered to the destination:
Extended Feature (Optional): You can also enter your own "Notes" about Postmaster Objects (data sources and destinations) using the 'Notes' tab.

