Creating or Editing Postmasters
When editing postmasters (or creating new ones) you must always remember that if you do make changes you have to restart the Postmaster Windows Services for those changes to take effect (applicable to the professional license only).
Also, while you can create as many different postmasters as you like, if you own a Developer License or if you are only evaluating the product with a Demo / Evaluation License you can only actually "Run" one HL7 Postmaster at a time (see Running Postmasters). With the Professional License when you run the UltraPort HL7 Postmaster MS Windows Services ALL of your enabled postmasters will be "Run" simultaneously. |
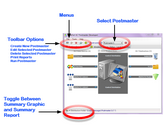
To Create A New Postmaster: In the main window look for this ![]() icon on the Toolbar or in the File menu.
icon on the Toolbar or in the File menu.
To Edit the selected Postmaster: In the main window look for the ![]() icon on the Toolbar or in the File menu.
icon on the Toolbar or in the File menu.
The Central Distribution Tab
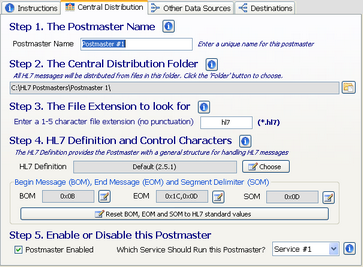
When editing or creating an HL7 Postmaster you first have to fill out the main properties in the Central Distribution tab.
•Step 1. The Postmaster's Name. Can be any alpha-numeric value and follows the same rules for creating file or folder names in Windows.
•Step 2. The Central Distribution Folder. Click the button to select (or create) the Central Distribution Folder.
•Step 3. The File Extension to look for. A 1-4 character file extension (no punctuation IE do NOT include a .). You may use a wildcard (*) in this field. Any HL7 data files placed into the Central Distribution Folder must have the file extension you enter here.
•Step 4. HL7 Definition and Control Characters. The default HL7 Version definition to use when processing messages
|
Q: |
How do I know which HL7 Version definition to select? |
A: |
This is a very common question and the answer is very simple, IT DOESN'T MATTER to the Postmaster at all. The version definition you select here WILL affect the behavior of certain features of the postmaster. See the section on HL7 Version Definitions for more information. |
•Step 5. Enable or Disable the Postmaster and choose the Service Instance to use (professional licenses only, see running as a service for more information).
After you have completed filling out Steps 1 through 5 you are almost done. Setting up the Central Distribution properties just sets the stage. For an HL7 Postmaster to actually "do" something you have to either a) create 1 or more Destinations b) create 1 or more Data Sources c) Both.
Your Next Step:
•Create Postmaster Data Sources
OR
•Create Postmaster Destinations


