*Screenshots are from the UltraPort SQL Schema Engine version 5.2.3
For more information on possible issues you may encounter when using MySQL see Troubleshooting MySQL.
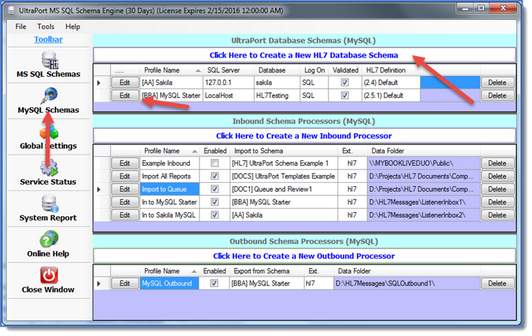
To access the MySQL Database Schemas section click the MySQL Schemas button on the toolbar in the Main Window to open the MySQL Schemas Section. From there you click the button that says Click Here to Create a New HL7 Database Schema (if creating a new schema) OR click the small Edit button next to an existing schema to modify an existing MySQL schema. This will open up the MySQL Schema Properties window (see below).
UltraPort MySQL database schema profiles are basically a set of information and instructions which tell the schema engine processors:
•How to connect to the MySQL Server Database which contains (or will contain) the schema tables (see creating schema tables)
•Whether the schema tables have been created or not (see verifying schema tables)
•Which HL7 vendor/version definition to use7 when creating and verifying the database schema tables
•Whether to allow the schema engine to perform database maintenance or not
•Schema Warning levels
Walk-through: Creating a MySQL database schema profile
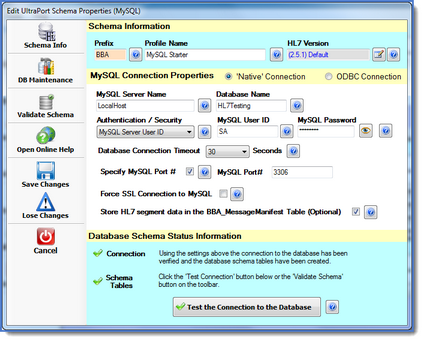
•Prefix. This is a 2 to 4 character value which you choose. It must begin with a letter (A-Z) and is not case-sensitive. When the program creates the SQL database tables it will preface the name of each one the value you enter here followed by an underscore. Example LAB1_HL7Data or LAB1_SEGMENT_PID_A. This is important because it allows you to either a) create multiple schemas within the same SQL database and/or b) create the schema tables right within your OWN SQL database without fear of overwriting any of your own database tables. **IMPORTANT: With MySQL you should ALWAYS insure that there are NO other database objects in your MySQL database with names that begin with the Prefix. This means that if you choose AAA as your Prefix you must not have any database tables, views, triggers, etc with names that begin with AAA.
•Profile Name. Since you can create many different schema profiles, each one must have a different name. It's a freeform value and allows you to easily identify your schema in the list of schemas displayed in the main window.
•HL7 Version. This one is important and should be carefully considered. Click the button next to the field to select the HL7 Vendor Definition to use as the basis for the schema. We recommend strongly that you create your OWN HL7 vendor definitions and select them here. See Before You Begin and HL7 Vendor Definitions for more information.
Starting in Schema Engine version 5.1 you select whether to to use "Native" or ODBC connection to your MySQL database.
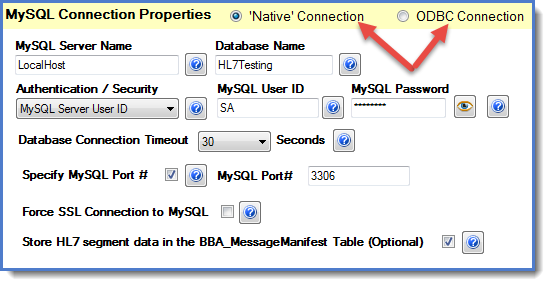
Choose MySQL Connection Type
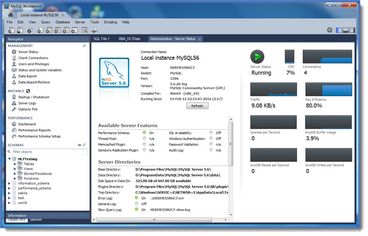
The "Native" MySQL connections in the UltraPort MS SQL Schema Engine were designed and certified using MySQL Version 5.6. If you are running an older version of MySQL you should use the ODBC connection option.
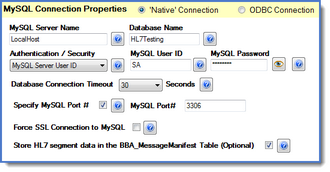
•MySQL Server Name. The name or IP address of the MySQL Server. Typically if the MySQL Server is running on the same computer you can use LocalHost (not case-sensitive) or the TCP/IP Address 127.0.0.1 in this field. If the MySQL Server is running on another computer visible within your network you can typically enter the computer name in this field as well.
•Database Name. The name of the MySQL database which will contain the schema tables. NOTE: The Schema Engine does NOT create SQL databases. You have to create the database yourself or enter the name of one that already exists in the SQL Server. •Authentication / Security. How should the Schema Engine gain access to the MySQL Server database. There are two options 1) Windows Logon (Trusted) and 2) MySQL Server User ID and password. This is VERY IMPORTANT and requires some thought before deciding which one is right for you. 1.Windows Logon (Trusted). The #1 support call we get here at HermeTech is from our database schema engine customers who chose this option without fully considering the implications. Choosing this option is usually the easiest, you can usually choose it and immediately continue on and everything works swimmingly. HOWEVER, this option is also how most users get into trouble and there are some things you need to remember if you use it. Using the Windows Logon means that when the schema engine runs it uses the currently logged in MS Windows user to connect to SQL Server. This all works just fine when you're in the configuration program creating schema profiles and running your inbound and outbound processors in local mode. BUT you have to remember that IF you want use the Schema Engine's MS Windows Services (see running as a service) you must remember that Microsoft Windows Services work differently and run in their own separate memory space and under DIFFERENT user credentials than the current user. So, if you choose this option and you want to run the services you MUST remember to go into the MS Windows Services snap-in and also configure the UltraPort Schema Engine services to run under the context of a Windows User as well. 2.MySQL Server User ID. Choosing this option is the one that we recommend that you use if at all possible. The downside is that you have to go into MySQL Server and create a log in / password AND make sure that the MySQL User has FULL access rights to ALL of the UltraPort Schema Tables. To help facilitate this, when the Schema Engine generates your database schema tables. IMPORTANT: For MySQL User IDs and Passwords are typically case-sensitive.
•Database Connection Timeout. The number of seconds the schema engine should use before it gives up trying to connect to the SQL Server. Valid values are between 5 and 60 seconds. The only important consideration here is to consider exactly WHERE is the SQL Server in relation to the Schema Engine on your network. If it's on the same computer/server then a short value (10 or 15 seconds) is probably sufficient. If your office is in New York and you're connecting to the SQL Server through a WAN to a server in Los Angeles you might want to choose something higher. •Specify MySQL Port #. In MySQL the default port number used is 3306, but can be configured to use a different port. If this is the case you can check the Specify MySQL Port # box and enter the MySQL Port #. If the box is unchecked the default port is assumed. •Force SSL Connection to MySQL. If checked then the MySQL data adapter will only connect to MySQL using SSL (note that SSL connectivity must be enabled in the MySQL Server configuration). •Store HL7 Segment data in the <prefix>_MessageManifest table (Optional). This option is completely optional and is NOT currently used by any portion of the Schema Engine itself.This option is only applicable for INBOUND processors. When an HL7 message is imported into the schema tables the entire raw HL7 message is stored in the main interface table (<prefix>_HL7Data) in a field called HL7Message. The <prefix>_MessageManifest table contains just as you might expect, a "manifest" of the HL7 message which is a "vertical" listing of each HL7 segment contained in the message. If you check this option then the RAW HL7 for each segment will also be placed in this table which you might find useful for your own software development. One important consideration before checking this is SQL table space. When the Schema Engine imports an HL7 message the amount of physical space used is approximately DOUBLE the size of the message (plus a smidgen). If your HL7 message is 3KB then it takes up 6KB+ of table space. This is primarily because (as described above) the program stores the entire message (3KB) in one field AND then parses out the data into the different schema segment tables. If this option is checked, then obviously that metric changes and goes from DOUBLE+ to TRIPLE+ because the size of all of the HL7 message segments is also 3KB.
|
The MySQL functionality in the UltraPort MS SQL Schema Engine were designed and certified using MySQL Version 5.6. For the ODBC functionality we have only regression tested back to version 5.3 ANSI MySQL ODBC Drivers. While we are quite sure that there is a "floor" when it comes to using older versions of MySQL we are not certain what that floor is. If you are using an older version of MySQL we recommend that you thoroughly test the product and make sure that it does what you want. If you are using an older version of MySQL and you encounter errors please don't hesitate to contact customer service for assistance.
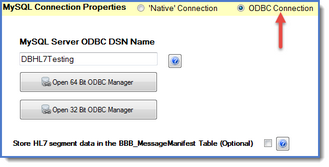
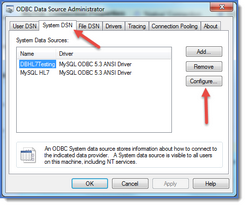
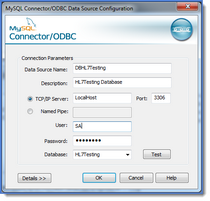
•MySQL Server ODBC DSN Name. The name of the ODBC connection DSN you have already created in the appropriate ODBC Manager. Anyone who has worked with ODBC drivers and ODBC database connections in MS Windows knows that Microsoft has some, shall we diplomatically call them "challenging" rules for which types of ODBC drivers you can use on different machines (64 Bit or 32 Bit). We have tested and certified using both 32-Bit and 64-Bit SYSTEM DSNs when running in both 32-Bit and 64 Bit Environments. The general rule of thumb is that IF you are running in a 64-Bit environment you should use 64 Bit-ODBC DSNs. We have provided the 2 buttons shown in the screen-shot above to attempt to "open" the ODBC manager application(s) on your computer. If they do not work, access the ODBC manager through the Windows Control Panel as usual.
•Store HL7 Segment data in the <prefix>_MessageManifest table (Optional). This option is completely optional and is NOT currently used by any portion of the Schema Engine itself.This option is only applicable for INBOUND processors. When an HL7 message is imported into the schema tables the entire raw HL7 message is stored in the main interface table (<prefix>_HL7Data) in a field called HL7Message. The <prefix>_MessageManifest table contains just as you might expect, a "manifest" of the HL7 message which is a "vertical" listing of each HL7 segment contained in the message. If you check this option then the RAW HL7 for each segment will also be placed in this table which you might find useful for your own software development. One important consideration before checking this is SQL table space. When the Schema Engine imports an HL7 message the amount of physical space used is approximately DOUBLE the size of the message (plus a smidgen). If your HL7 message is 3KB then it takes up 6KB+ of table space. This is primarily because (as described above) the program stores the entire message (3KB) in one field AND then parses out the data into the different schema segment tables. If this option is checked, then obviously that metric changes and goes from DOUBLE+ to TRIPLE+ because the size of all of the HL7 message segments is also 3KB.
|
Once you've completed filling out this page you should verify that you've entered everything correctly by clicking the 'Test the Connection to the Database' button.
![]()
When clicked, the system will validate your entries and attempt to connect to MySQL using them. NOTE: If you typed something in wrong you might have to wait for as long as the value you selected for the Database Connection Timeout for the system to respond. If everything is correct then you can save your schema profile, but you're really not done yet. Keep reading for your next steps. Obviously you can't actually DO anything unless you create your schema tables (click here for the how-to). If you're new and are evaluating the UltraPort Schema Engine then you can just jump in and start experimenting with what it's capabilities are, however, before you actually try and implement the Schema Engine you should read the Before You Begin section thoroughly.
Other Web Resources: MySQL.com Downloads
Your next steps: Creating Schema Tables or setting up the database maintenance plan and entering your schema warnings settings.
